My Ergo-Mech Adventure (part 2)
My Ergo-Mech Adventure (part 2)
See part 1
My Model 100 Arrives
 My Model 100.
In September of 2022, my Model 100 finally arrived. I knew that uncertainty was in the nature of crowdsourcing campaigns and the progress reports made it clear that the delays were needed to be able to deliver the best possible product. Keyboardio made the right call taking all the time that required. The delay, though, meant I already had an idea what to expect from an ergo mech keyboard, and I had already developed a system of programming macros that I was looking forward to porting to my new keyboard.
The Model 100 is based on a different design philosophy, one it appears— at least from what I’ve read online— that most of the ergo-mech community embraces: that is, if you’re going to switch to an ergo-mech keyboard, you should go all in and change everything for ergonomic advantage, retraining your fingers even though that means your ability to type on a standard keyboard will be impaired.
The most distinctive feature of the Model 100 is the button meant to be operated by the edge of the palm, by default a layer shift key. This is an interesting idea, and works well unless you need to press a thumb key at the same time— then, the exact distance between the palm key and the thumb keys really needs to match the size of your hands, but it’s fixed in a position that’s for hands a bit smaller than mine.
One thing common to these split ergo designs is that they have a lot of keys for the thumb. The Model 100 has four. In the standard mapping, the modifier keys are all thumb keys, with control and shift keys on both sides, a GUI key on the left, and an alt key on the right. There is a space key the size of a regular key on the right, and the corresponding key on the left is the backspace.
I never got used to the idea of not having all the modifiers on both sides, so that a key with Ctrl+Alt modifiers is necessarily a two-handed operation. As I think about it, I realize that I press all the modifier keys with my left hand if at all possible, and only use the right hand if something is too incredibly awkward to do otherwise. It’s kind of like a rule I follow without thinking about it, like the order of adjectives in English. When it came to retraining my fingers to use this special keyboard, changing this unwritten rule was definitely the hardest thing to wrap my head around.
I also didn’t like not having a space key on the left, perhaps because I’m left-handed. I could have swapped space and backspace, but instead I decided to have a space key on both halves, so I made the backspace key layer+space.
Another change to the keyboard layout on the Model 100 is that, since the layout is split, they have placed an extra column on the right of the left half and the left of the right half. They have moved keys here that the pinkies need to reach out for on the standard layout, so the stronger index fingers can reach them instead. The tab and escape keys are on the right of the left half, and the enter key is on the left of the right half. In the four months I used my Model 100, I never learned not to overshoot and hit enter when reaching for the h key, so I would frequently post just “T” in my company chat app when I was trying to start a sentence with “The”.
The firmware for the Model 100 is not QMK, but a different open source project called Kaleidoscope. Kaleidoscope is written in C++ instead of C, which I find more difficult, and the documentation is very sparse. There is a community with a message board and a Discord chat, but it’s still difficult to get the information needed to do anything sophisticated. I managed to port my chorded programming macros over as I had them on the FoldKB, but implementing the caps lock blink I found so useful was beyond me, at least in the time I was willing to invest without getting paid. (Users who aren’t as geeky as me can probably do all the customization they want in Chrysalis, the GUI tool they provide.)
One feature which is better geared towards the “lots of thumb keys” design that I tried is called “Space Cadet Shift”, which is available in both Kaleidoscope and QMK. This is where keys can be set up to have one behavior when tapped and another when held down. I used this to make the left modifier thumb keys into the opening paren, bracket, and curly brace when tapped, and the right modifier thumb keys into the corresponding closing closing mark when tapped. I never really got used to this, but I could tell that it could work nicely for someone who was more committed to re-learning how to type.
The keys of the Model 100 are sculpted to fit together just so; it has a distinctive, aesthetic look but one consequence is that you have to order special keycap sets for it. One interesting option they have is a set of arbitrary symbols on the keys, so they’re easier to visually identify but aren’t tied to a specific mapping. The symbols they use for this are the as yet undeciphered characters of the Minoan script known as Linear A. I got a set of these and since I was still learning this keyboard layout, I only replaced the standard QWERTY keys where my layout changed from the default. This worked well enough, but the Linear A keycaps have more of a matte black background while the QWERTY keycaps are shiny, so they didn’t match exactly.
About Tenting
In the language of split ergo keyboard enthusiasts, “tenting” is tilting each half away from the center. Commercially mainstream “bump” keyboards like the Microsoft Sculpt use this idea instead of separation to achieve their ergonomic benefit. Even with your hands straight out in front of each arm instead of reaching inwards, your wrist isn’t at its most comfortable resting on a horizontal surface; they naturally want to turn in towards each other a bit.
I didn’t mention tenting in my earlier piece about the FoldKB, because my approach was very informal: I propped up the inner edges with some small pieces of wood I happened to have lying around. Tenting systems can become very sophisticated, though. The Model 100 has a standard tripod mount on each half, which allows for some creative mounting options, as can be seen in this thread on Keyboardio’s community forum. As an Indiegogo campaign supporter, I also received their standard tenting solution, an eight-legged “octopus” base pad which has a fixed tilt but whose direction of tilt can be adjusted.
While their description of these base pads presents being able to tilt the keyboard forward or backwards as a feature, in practice I found that I spent a lot of time fiddling with them trying to get the tilt exactly to the sides.
I really wanted to experiment with a larger tenting angle, and I came up with the idea of 3d printing a base that would go underneath the octopad base and hold the legs at an angle. This was a great project for me to level up my skills in OpenSCAD, the 3D design language. I used the customizer to build a stand for the octopad base with a custom (additional) tenting angle which can be found on Thingiverse.
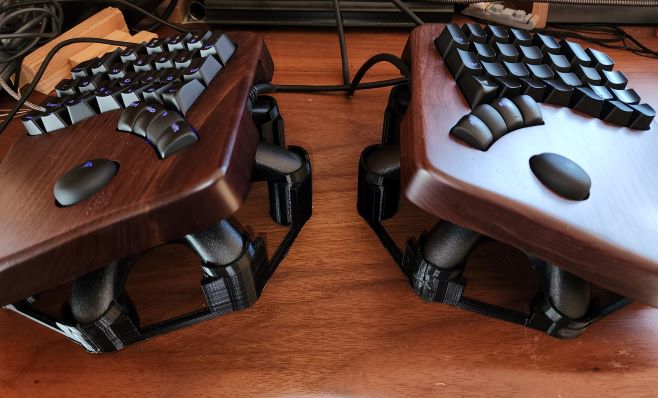
My tenting contraption
I think I was the only one to ever print this, but it’s just as well: The octopad base already adds nearly an inch to the height of the keyboard above the desk and my stand adds another inch, which leads to the keyboard being way too high above the desk to type on comfortably.
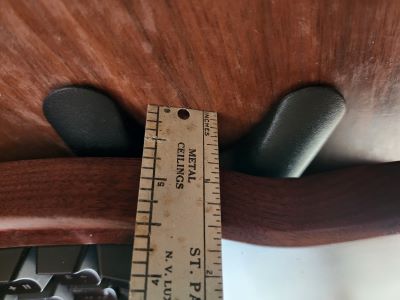 |
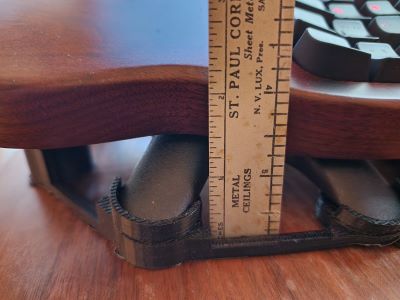 |
| Height of lower edge with octopad base (getting up there) | Height of lower edge with my 3D printed base (too high!) |
Shortly after I abandoned my efforts at tenting, I developed a problem where one of the outer thumb keys was sticking, due to the wood changing shape. Jessie at Keyboardio guessed that the wooden shell hadn’t been properly cured, and immediately sent me a replacement. I was really happy with their no-nonsense customer service. Still, I had to wait a while for the replacement shell to arrive. In the meantime, I went back to my FoldKB. When the new shell arrived, it was remarkably easy to swap out, and my Model 100 was back in business. But going back to the FoldKB was so easy after struggling to learn the Model 100, I decided I had given it a serious try, and put it back in its case indefinitely, going back to my FoldKB for daily use.
The FoldKB was almost perfect, but there was one thing I wished could be better: the horizontal rows of keys made my fingers stretch unequally. My middle and ring fingers would like to stretch forwards a bit more. The cure for this is what’s known as columnar stagger: where the columns the longer fingers naturally rest on are just a bit further out.
I asked on the r/ErgoMech subreddit if there was something like I was looking for. An amateur keyboard designer named Evan Spreng replied that he had made a keyboard exactly like what I was looking for, and he had a few PCBs left and could make me one. My next split ergo keyboard would be the Sprengboard Tweedle, which will be the subject of part 3.
… and that’s where the story would end, but …
I got my Model 100 back out when I decided to write about my experiences. One thing that I hadn’t even thought about when I was using my Model 100 before was the switches. When I got it back out, I happened to have on hand a bunch of cheap clicky switches my son had gotten with a keyboard he bought and had swapped out. I thought what the hey, and tried swapping out the switches I got with the Model 100 (the recommended BOX Silent Ocean Islet switches) for these cheap, light clicky switches.
I hadn’t realized how important switches were. One of my main frustrations with the Model 100 was that the keys seemed stiff. Light switches made the keys come alive. And, while I’m no fan of noisy keyboards, the clicks that had sounded unbearably cheap in my son’s flimsy plastic keyboard were transformed into this delicious richly resonant THOK sound by the wooden casing. It was almost enough to get me to like clicky keys.
I had just lucked out by picking really light switches for my first split ergo, the FoldKB. Now I know I like really light switches … but without the clicks, please.