My Ergo-Mech Adventure (part 1)
My Ergo-Mech Adventure
As a professional programmer, for years I’ve wanted an ergonomic keyboard. I realized that a split keyboard would be ideal long before I knew anything about the keyboard hobbyist scene. I had seen enough wrist braces on my colleagues at work to know ergonomics was important, and I knew my hands just felt like they wanted to be further apart than the common “bump” ergonomic keyboards I’d seen would allow. Over the years I kept looking but only knew about the standard mass-produced non-mechanical ergonomic keyboards I saw on Amazon and kept having too many doubts about whether they were worth the money to buy one.
Then my son became interested in the mechanical keyboard scene and wanted to build his own keyboard. Even though he wasn’t into ergonomic or ortholinear keyboards at all, his interest got me to look at the wide world of ergo-mech keyboards that had become a huge DIY community on the internet.
A Model 100, maybe?
At that point— in March 2022— I decided to jump into the fray by joining an Indiegogo campaign to get the new Keyboardio Model 100, which was estimated to ship later that month. I thought I would soon be entering the ergo mech world.
…but not soon. How about a FoldKB?
Due to the complexities of getting something manufactured to exacting specifications in China, back when COVID was still an issue, the Model 100 ship date kept slipping. Also, my son was disappointed I hadn’t ordered a kit that he could help put together. In May, I saw that the Keebio FoldKB was on sale and decided to order a kit. I only soldered a little bit decades ago, but surely I could figure it out. And with its boxy design, it would be easy for me to 3D print a case.
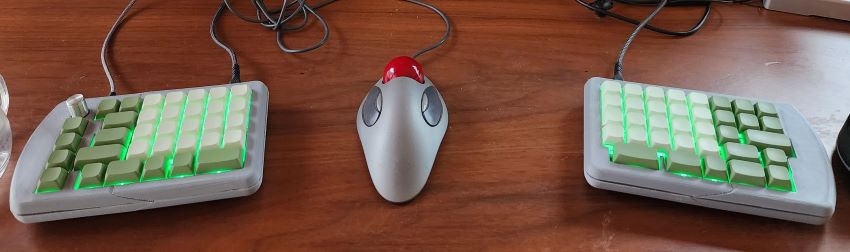
I cheaped out on all the components because I was still expecting my “real” ergonomic keyboard to come sooner or later. The switches and keycaps came from Amazon: I got Akko Vintage White switches, a cheap brand which I already had a half box of from my son’s keyboard project. I got a cheap keycap set for the ErgoDox which I thought I’d be able to make work, despite the absence of 1.25u keycaps. I really wanted blank keycaps and I liked the green theme. (Later I would get annoyed with that and special order the other keycap sizes I needed.) I got green LEDs because the FoldKB only supported backlighting and I was already going with a green look, and they were cheaper than white LEDs.
Building the FoldKB was a comedy of errors. I had to spend hours looking for a video on YouTube that would show me how to put a stabilizer together correctly. I soldered the switches on before I realized that they needed to go thru the plate first, so I had to desolder everything and do it over again… on both boards. But eventually, with a bit of help from my son, I was able to get it together correctly.
 This is my original layout: note the alternating 1u and 1.5u keys on the bottom row; some of those are the modifier keys which should have been (and I later replaced with) 1.25u keycaps.
The 3D printed case is based on the STLs from Keebio’s repo with some extra bits added in Tinkercad to fill in spaces created by my non-standard keycap sizes. I also split each case piece at a diagonal using Meshmixer; this is because my print bed was too small, and cutting at a diagonal allowed me to have one bolt that goes thru all the pieces.
Is the FoldKB a losing design?
It definitely seems that Keebio doesn’t think the FoldKB will be that successful; it was on clearance sale when I bought mine and now they’re apparently making small batches because people still want them, but they’re not willing to stock a larger amount. They also didn’t think it worth the effort to come up with a decent default keyboard mapping; their setup has no function or arrow keys, but in their inattention they have added keys to control RGB lighting that the FoldKB doesn’t support. (Fortunately, my keyboard mapping is now in the QMK repo as another alternative.)
I think their logic must be that if someone wants a split keyboard that has a similar layout to a standard keyboard, they probably don’t want an ortholinear keyboard (and would get something like a Quefrency), and if they know they want an ortholinear keyboard, they probably will value ergonomic design features more than similarity to a standard keyboard (so they’d probably get an Iris).
This misses an important point about hand orientation: when you’re reaching inwards towards a standard keyboard, your fingers are at an angle, but if you position a split keyboard so that each half is in front of your natural hand position, your fingers are pointing straight ahead. If you will still be using a regular keyboard sometimes, an ortholinear that resembles a standard keyboard layout will soon seem very natural, probably more natural than a split row-staggered keyboard.
Adventures in QMK
All modern keyboards are little computers with a modest CPU, called a microcontroller, running a program that’s constantly looking for key press and key release events, processing that information, and sending the resulting events to the computer. This program, called the firmware, decides what logical keys are said to have been sent when a physical key or key combination is pressed, and can also control lights, audio, or whatever other gadgets are attached to the keyboard. In the mechanical keyboard hobbyist scene, this dedicated program is typically open source, and designed such that the owners of individual keyboards— and the designers of new keyboards— can easily adapt it to their purposes.
The firmware used by the FoldKB, and many other keyboards, is called QMK. It has a straightforward structure: the core code implements the loop to detect key presses, also called the event loop. The keyboard designer fills in specific functions which end with _kb to provide the details of that specific hardware. The user of a specific model of keyboard can then provide specific functions which end in _user to modify the behavior of his keyboard. These _user functions are provided at many places in the event loop, but only a few are used often. To only change which keys are mapped to what, the user only needs to provide an array called keymaps defining them.
QMK and similar firmware implements a concept called layers to assign multiple possible functions to a given key. A layer is a complete map of the keyboard layout that is activated in some user-defined way, such as holding down a special key. It’s useful to think of this layer key as a modifier similar to the shift, control, and alt keys. When a modifier key is pressed, it changes what other keys do— say, sending the codes for capital letters instead of lowercase. The standard modifiers aren’t implemented with layers, but the layer system allows the user to define other modifier keys. In QMK, up to 32 layers can be defined, so you can go really crazy with them. I’ve only ever used three at most, and the third layer I barely used.
Layer Zero
My layer zero— the one which is in effect by default without any modifiers— looked like this:
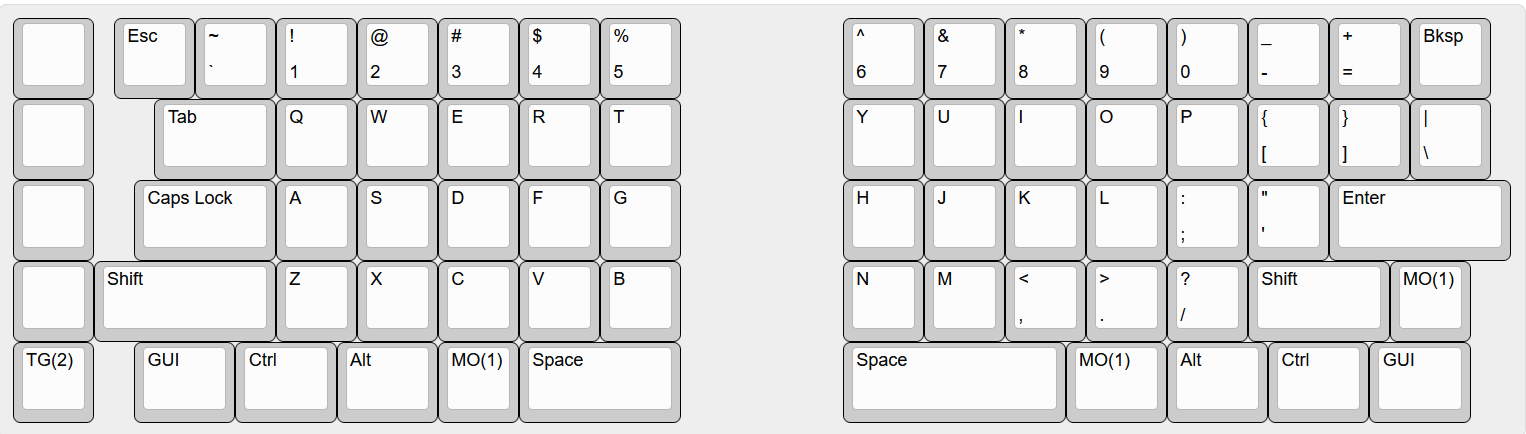
This is pretty much the standard QWERTY layout, in an orthogonal format. The key labeled MO(1) is the layer shift key; that’s QMK’s notation for “momentary shift to layer one”; that is, you’re in layer one as long as you hold it down, and go back to layer zero when you release it, similar to how the other modifier keys work. The one labeled TG(2) is a toggle to layer two; it works like a Caps Lock key so that one press puts you in the layer, affecting all of your keystrokes until a second key press takes you back out.
I did briefly consider trying some other keyboard layout; I thought Colemak might be worth a try, especially since it left the standard cut and paste keys— X, C, and V— in their familiar convenient locations. However, there is now a variant named Colemak-DH, which is apparently more popular than the original, which moves the V key. I knew the DH variant was taking over when I found that Colemak-DH was in the keysets I could get for my Model 100, but not the original Colemak. In the end, I decided that I really liked the fact my fingers already knew where the keys were from several decades of QWERTY typing, and since the ergonomic benefit of a split keyboard was far more than what a change of layouts would provide, and I was not aiming to become a speed demon typist, it made the best sense to stick with what I knew.
I did swap the GUI (aka “Windows”) key with the Control key, since I rarely used the GUI key and it was more comfortable to reach the Control key in that position.
I experimented with various mappings for the leftmost column of keys, but I only ever used the one I’ve labeled TG(2), so here I’ve left the others blank.
So, what did I put on layer one? My first order of business was providing the arrow keys and function keys that I really need for coding. It’s pretty standard on keyboards lacking function keys to use layer + number, so that holding down the layer key and pressing the number 1 key would send F1. F10 maps to the 0 key, and F11 and F12 are then next keys across the top.
For the arrow keys, after briefly trying mapping them to WASD as is found in Minecraft and other games, I realized that I really expected my arrow keys to be on the right, as they have been on every keyboard I’ve used. I came up with a mapping which had the arrow keys over the home keys so they were readily available, in a layout that had become standard.
Layer One
Here is the right half of my layer one:
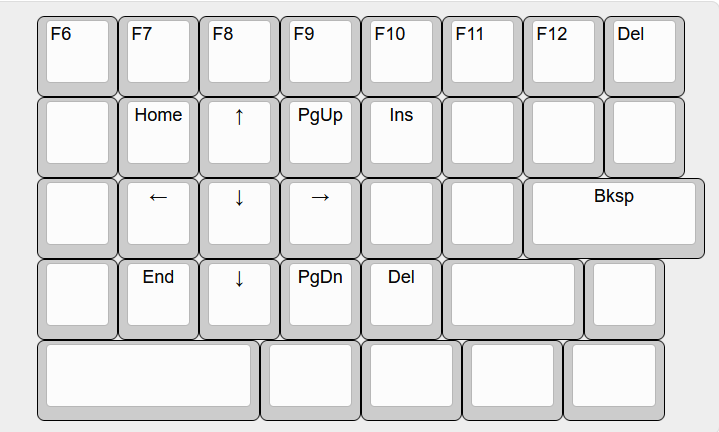
Note that in this map, the blank keys are “transparent” which means they keep their mappings from the lower layer. The only keys for which this matters are the modifier keys, so that for instance Shift + an arrow key (which selects a region in many editors) works as expected.
The F1 - F5 function keys are on the left half as you would expect, but the other key mappings on that half I’ll discuss later.
The arrow key cluster is sort of a combination of the keys you’d find on a number pad when numlock is off, and the separate arrow keys you find on keyboards with those. This is why the down arrow is defined twice; it matches both mappings. The Home, End, PgUp, and PgDown keys are in the places they’re usually found on the number pad; Ins and Del I just put nearby. It’s centered on the home keys so these keys are always easily accessible.
The backspace key on the FoldKB is a 1u key in the upper right corner; which is kind of small and out of the way for a key I use so much. I mapped the enter key to backspace in this layer to have a bigger, closer key— but I still never really used this mapping.
Having taken care of these keys, I had the whole left half free for whatever I found useful on layer one. As a computer programmer who works mainly in Typescript, I really wanted to make some of the symbols I commonly use more readily available. In particular the curly braces (“{“ and “}”) and square braces (“[” and “]”) are ones I use constantly but are in an out-of-the-way position in their standard mapping. For me, curly braces are more common than square braces, so I wanted to flip the sense of the shift key from the standard mapping, so the square brace would be a shifted curly brace. I put these right on the home row, on the D and F keys. I made parentheses (“(“ and “)”) and angle brackets (“<” and “>”) live on the E and R keys just above.
I wanted to map some common key sequences like “===” to a single key, and I realized that whenever I type “===” in code, it almost always has spaces before and after, so it’s actually “ === “. I came up with a system where the primary symbol, with spaces before and after, would be mapped to the key, a variant would be on the shifted version— in the case of “ === “ I have “ == “ on the shifted version, to support every other C-family programming language— and the ctrl key suppresses the spaces.
These macros are shown in red on this diagram of my left half layer one keymap:
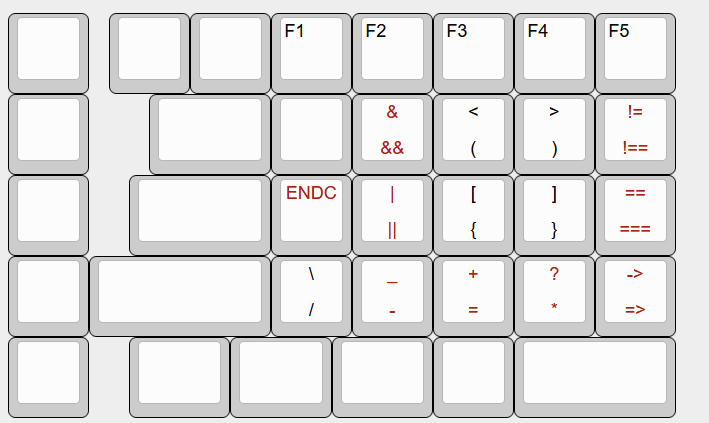
The macro labeled ENDC is special: it goes to the end of the line by sending the End key, then enters a semicolon and a newline. The shifted version doesn’t enter the semicolon (for languages like Python and Go) and ctrl in this case suppresses the newline. The mapping is meant to be the left-hand corollary to the semicolon key, however, I think I will put it on the actual semicolon key, which I don’t have mapped.
It’s worth noting that this arrangement depends on chording; I’m having to combine the layer key with the shift and/or the ctrl key all the time. This is familiar to me as I already use combinations of modifier keys in my code editor of choice: Visual Studio Code. The layout with the standard modifier keys in the same position as on a regular keyboard and the layer key where it can be reached by the thumb worked fine for this.
Layer Two: Minecraft Mode
I don’t play games that often, but sometimes I enjoy Minecraft. It’s a bit annoying to play on a split keyboard because the number row is used to select what item you’re holding, and half of the numbers are on the right half of the keyboard. Most of the other keys are on the left side— it’s designed to be played with your left hand on the keyboard and your right hand on the mouse. I made a special mapping so that I’d have all the keys I needed on my left half, and I could set the right half aside. I liked it better than the standard mapping because the keys I needed were all within easy reach.
Here’s my Layer 2 Minecraft mode for the left half, with the WASD keys are highlighted for reference:
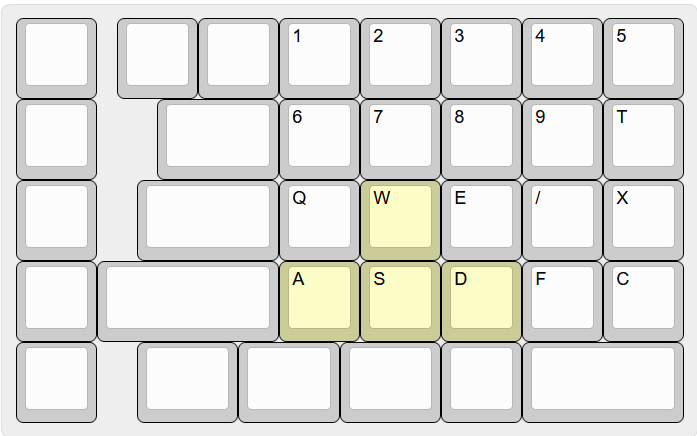
I just moved the WASD keys down a row and inserted the numbers from the right half into the second row. It’s close enough to the standard layout that it’s easy to use, and I managed to map all the keys that I regularly use in the game.
What about the lights?
The FoldKB is designed to support plain backlighting, which means a single-color LED can be installed on each switch, and the only parameter which can be controlled is the brightness, which is the same for all lights on the board. This is very minimal compared to the per-key RGB “gamer lights” my Model 100 would have, where each key can be programmed individually to display a full range of colors. I took it as a challenge to get the maximum usefulness out of such a minimalist feature.
The first thing I did was to assign each layer to a brightness level, so that the default was dim but my keyboard would brighten when I was holding down the layer key. It’s hard to say if this really made any difference, but I feel like the subtle confirmation that I was using my layer key made me more attuned to my typing experience— but it was definitely a small thing.
One thing I really missed was having some indication that the caps lock key was on. There were no dedicated LEDs for caps lock, num lock, or scroll lock of the sort one might find on a regular keyboard. I never used num lock or scroll lock, but I often used caps lock— especially when writing SQL in the standard fashion where keywords like SELECT are written in all caps. I wanted to make my whole keyboard blink when the caps lock was on. There is a lighting effect supported by QMK called “breathing”, where the lights brighten and dim in a smooth, continuous manner, but that’s not what I wanted. The state of having caps lock on is one I don’t want to be in for long; I wanted an indicator that was jarring, that if I ever got into by accident I would rush to get out of. I definitely wanted hard on and off blinking.
It took some research, but eventually I wrote a housekeeping_task_user function, which is a hook QMK has that gets run once after each key-detection loop. There, I checked whether the caps lock was on, and used the timer_elapsed function to toggle the lights every 350 milliseconds if it was. This was very effective; caps lock blink was awesome.
I eventually used the breathing effect to identify Minecraft mode. I was a little hesitant to do that because I thought it might distract from my game play, but I found that when I was running from creepers I barely noticed my keyboard breathing. On the other hand, if I got into Minecraft mode by accident, as sometimes happened, I could tell right away what the issue was.
Minimalist as it was, I was able to communicate a lot of information with the backlighting.
One more gadget: the encoder
The FoldKB had the option to include a knob called an encoder on the upper left of the left-hand board, something that’s popular on a lot of custom keyboards. I had no idea what I would do with an encoder, but I wanted all the bells and whistles my new keyboard could support, so I got one.
Then I had to figure out what to do with it. The most common recommended use I’ve seen is as a volume knob, but I’m not really fond of media keys. I had played with mouse keys— a way to get the keyboard to emulate a pointing device— but found it too clunky to be of any use. I realized, though, that I could map my encoder to the scroll wheel, and then I could scroll pages in my browser by turning the knob. When I did that, I found that I was using my encoder all the time.
Then I found another use, which I mapped to turning the encoder while holding down the Layer 1 key.
Here I have to admit, somewhat embarrassed, that I’m using Windows. I have been primarily using Linux at home since my first Slackware install in 1995, but for my most recent employment led me to purchase a Windows laptop for work. Every moment I’m not in an app, I’m either in a Linux virtual machine or at the MSYS2 command prompt trying to get my machine to act enough like a unix box so as not to drive me nuts.
But the GUI feature that I knew I couldn’t live without when I first saw it on my first Linux box in 1995 finally came to Mac OS X in 2007 and Windows in 2015: virtual desktops. Switching between desktops, each with related apps open together, logically organized and none of them too crowded, I find essential.
With my Layer 1 key down, I can switch between desktops by turning the encoder knob. This is incredibly useful and seems very natural as the Windows virtual desktops are laid out in a horizontal strip.
Now that my FoldKB was all set up and I was enjoying it immensely, my Model 100 finally arrived in August of 2022.